Getting Started
Integrating a wallet connection into your React.js web app has never been easier than with Xellar-kit. Designed with smart defaults, it lets you concentrate on development while handling the essentials seamlessly.
1. Installation
Install xellar kit with other peer dependencies using your favorite package manager:
npm install @xellar/kit wagmi viem@2.x @tanstack/react-query- Wagmi is a React Hooks library for Ethereum, this is the library you will use to interact with the connected wallet.
- Viem is a TypeScript interface for Ethereum that performs blockchain operations.
- TanStack Query is an async state manager that handles requests, caching, and more.
- TypeScript is optional, but highly recommended.
2. Setup & App ID
-
Xellar Kit utilises WalletConnect's SDK to help with connecting wallets. WalletConnect 2.0 requires a projectId which you can create quickly and easily for free over at WalletConnect Cloud (opens in a new tab).
-
You'll also need to create an app on the Xellar Dashboard (opens in a new tab) to get your App ID which enables Xellar Passport integration.
3. Setup Origin
To ensure your application can properly communicate with Xellar services, you need to configure the origin in your Xellar Dashboard:
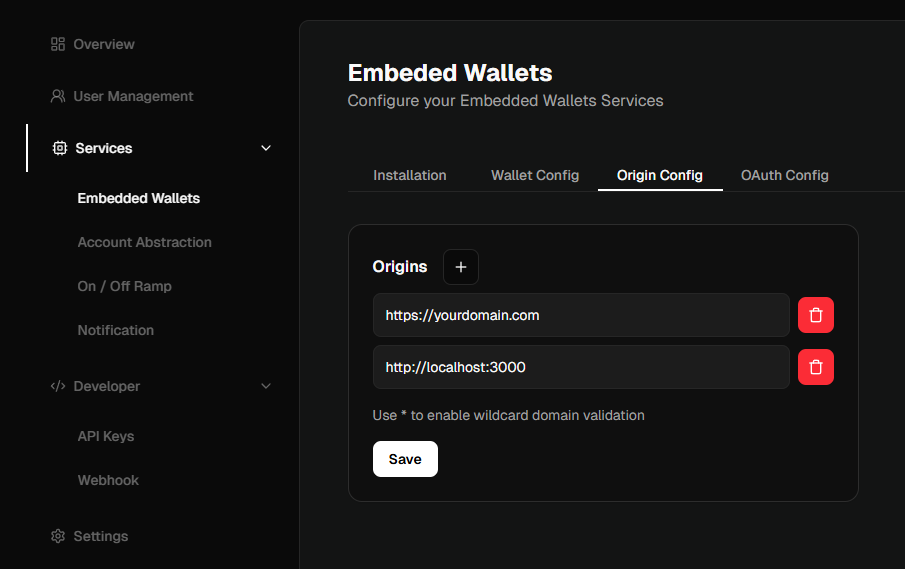
- Log in to your Xellar Dashboard (opens in a new tab)
- Navigate to Embedded Wallets Services menu
- In the Origin Config section, add your application's domain (e.g.,
https://yourdomain.comorhttp://localhost:3000for development) - Save the configuration
This step is crucial for security and ensures that only requests from your authorized domains can access your Xellar app credentials.
4. Implementation
It is recommended to wrap your app within a new component that will help you set up Xellar Kit and its dependencies.
Start by creating a new component called Web3Provider. Here you will import the required providers and create a config using pre-configured
getDefaultConfig function to simplify the process of creating a config.
Below is a simple example app using getDefaultConfig to help you get started:
import React from "react";
import { Config, WagmiProvider } from "wagmi";
import { QueryClient, QueryClientProvider } from "@tanstack/react-query";
import { XellarKitProvider, defaultConfig, darkTheme } from "@xellar/kit";


const config = defaultConfig({
  appName: "Xellar",
  // Required for WalletConnect
  walletConnectProjectId: 'YOUR_WALLET_CONNECT_PROJECT_ID',

  // Required for Xellar Passport
  xellarAppId: 'YOUR_XELLAR_APP_ID',
  xellarEnv: "sandbox",
  ssr: true, // Use this if you're using Next.js App Router
}) as Config;

const queryClient = new QueryClient();

export const Web3Provider = ({ children }: { children: React.ReactNode }) => {
  return (
    <WagmiProvider config={config}>
      <QueryClientProvider client={queryClient}>
        <XellarKitProvider
          theme={darkTheme}
        >
          {children}
        </XellarKitProvider>
      </QueryClientProvider>
    </WagmiProvider>
  );
};
5. Connected Wallet Info
For numerous scenarios, you'll need to retrieve the linked wallet details via Xellar Kit to enable additional interactions. This functionality is available through various hooks like
useAccount provided by wagmi (which Xellar Kit depends on).
As shown previously, our application was encapsulated within a <XellarKitProvider> at the root level. Ensure any components leveraging wagmi hooks are nested within this provider structure.
The following demonstrates a basic component showcasing how the useAccount hook enables access to wallet connectivity status and address information:
import { useAccount } from "wagmi";

// Make sure that this component is wrapped with XellarKitProvider
const MyComponent = () => {
  const { address, isConnecting, isDisconnected } = useAccount();
  if (isConnecting) return <div>Connecting...</div>;
  if (isDisconnected) return <div>Disconnected</div>;
  return <div>Connected Wallet: {address}</div>;
};
Components
<XellarKitProvider /> | Provides state and data to various Xellar Kit components. Wrap XellarKitProvider around your React app. |
<ConnectButton /> | Button component for wallet connections. Position this element wherever you want users to initiate wallet linking. |
<ConnectButton.Custom /> | Create a personalized connection interface. Render props expose different authentication statuses for flexibility. |
Hooks
useConnectModal | Hooks to open the connect modal |
useProfileModal | Hooks to open the profile modal |
useChainModal | Hooks to open the chain modal |
Showing Confirmation Dialog
Since Version 1.3.0, Xellar Kit supports showing a confirmation dialog when users sign messages or transactions if they're logged in with the Xellar Embedded Wallet Service. This security feature ensures users can review transaction details before confirming, enhancing transparency and reducing the risk of unauthorized or unexpected transactions.
By default, the confirmation dialog is enabled for all transactions.
To disable the confirmation dialog, you can pass showConfirmationModal={false} to the XellarKitProvider component.
<XellarKitProvider
    showConfirmationModal={true} // or false to disable the confirmation dialog
  >
  <App />
</XellarKitProvider>